Building an Inexpensive Inflated Double-poly GreenhouseWant the best insulation factor and lowest construction cost, easiest to build greenhouse imaginable? Consider inflated double-poly. The advantages of this system are many. You can use whatever type of benches you have or want; or you can use it without benches, as it is completely free-standing. The air between the layers gives you pretty good insulation, reducing heating costs, and condensation. Many of the materials can be scrounged or have alternatives. This is one of the least expensive ways to get a very reasonable greenhouse. The basic idea is to create a ground-to-ground arch, with wooden perimeters that you can nail redwood lath to, after rolling the edges of the poly sheeting in the lath. Most of the greenhouse is an inexpensive frame of electrical conduit or PVC pipe. You custom-frame the end-walls for your particular application. |
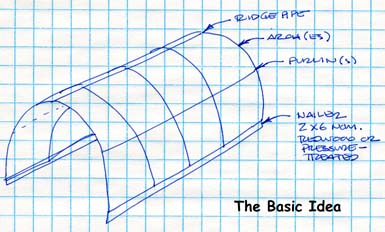 Here you can see the Arches, which are circular in this example, and the Ridge Pipe, which runs along the top of the roof, and the Purlins, which define the vertex between the roof and side walls, and strengthen the greenhouse. The Nailers run along the ground, and give you something to hold the poly sheeting with. I used 2 X 12's for my first greenhouse, and the pictures here look like 2 X 4's, but I think 2 X 6's or 2 X 8's would probably work well for the nailers. They should be Redwood or Pressure-treated wood, as they are in contact with the ground, and constantly wet. I just framed up end-walls using redwood to match the contours of the greenhouse, and built a door into one end, and an opening for a swamp cooler in the other.
|
 Here you can see a detail of how the Nailers are connected using u-bolts. The u-bolts are connected into a recessed area, so the poly sheeting and lath can be nailed over the holes.
This was the set-up I used for thinwall electrical conduit. (Except that I used 2 X 12's and had 2 u-bolts per upright; it was a 20 X 40 foot greenhouse.) If you use PVC, you may need to figure a stronger way to connect these. You might try putting a piece of rebar into the ground about a foot or eighteen inches, and then putting the PVC down over it, so the rebar runs up inside the PVC where the u-bolt clamps it. That might be good enough. On the other hand, it might just transfer the force to the point at the end of the rebar ... |
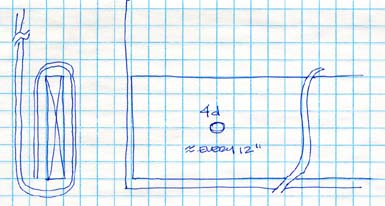 This shows how to use the redwood lath to hold the poly sheeting. This picture shows the bare MINIMUM amount of wrap, it is better in practice to use another full turn. This minimum amount takes 5 inches, I usually allow 12 and wrap extra. Tips: staple the poly sheeting to the lath before rolling it up; use the factory edges of the poly to staple to your lath as often as possible, they are nice and straight; gently pull the poly tight when stapling, do not stretch; fasten with 4d hot dip galv. nails every 12 inches for inflated poly or high-wind situations, every 24 inches for other purposes. Pneumatic staplers work really well in place of the 4d nails, and make this a much easier job.
|
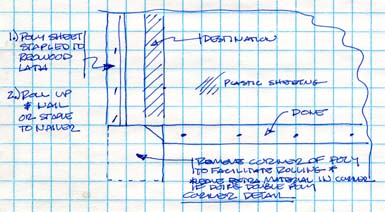 The corners can be a little tricky: if you do not trim the poly sheeting, it rolls up into a big wad, and it is really hard to deal with; but if you trim it too close, it doesn't seal as well. If you are just working with single layers of plastic sheeting at one time, don't worry, it's no big deal. If you are working with a double layer that you are going to inflate, then be careful not too trim it too much, or you will be sorry. It's a good idea to trim one side at a time, so one of them gets rolled to make a better seal.
|
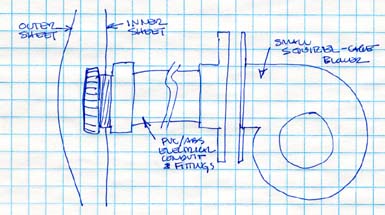 I have used PVC electrical conduit and fittings to connect my squirrel-cage blowers to the plastic. Basically, you roll up the double sheets together and nail them, so they are sealed all around the edges, and then you use a small squirrel-cage blower to keep the space between teh poly sheets inflated to about 7 p.s.i (or about 10 inches of water cloumn.) Too much pressure and the poly fails earlier, too little, and it just doesn't work well (flaps in high wind or allows too much deflection if pushed against.) You can cover the inlet of the blower to control the static pressure, and you can measure the pressure with a 3/8 - 1/2" id clear plastic tube filled with water: put about 12-14 inches of water in the middle of a 36-48" tube, make the tube into a u vertically with the water in the bottom, place one end in the pressurized area through a small slit, measure the difference in the surfaces of the two ends of the water. When you inflate the greenhouse, the airspace between the two layers of poly sheeting will expand, and you will see a cushion of about a foot in the larger spaces, down to zero where the two sheets meet at the edges. This gives great insulation and the pressure distributes any force exerted on the exterior of the greenhouse, EVENLY over the entire inner surface and framework. Very elegant. My tropical house used to get frost on the roof, that's how well this insulates.
|
 This shows how a thinwall electrical conduit purlin attaches to the uprights using a u-bolt. The u-bolt has the bolts facing the inside, so they don't interfere with the poly sheeting on the outside. The ridge pipe basically attaches the same way. With PVC, you could use those expensive 4-way joints.
It is best to put your shade cloth for the mid-winter on BEFORE (underneath) your poly sheeting. You can add shade cloth to the outside for mid-summer or spring and fall adjustments, or use shade compound directly on the poly. Shade compound on the outside of the poly sheeting will make it last several times longer than if no shade is applied. |